A client’s Workflow is the complete set of recurring and one-time tasks needed to serve that client — monthly bookkeeping, quarterly VAT returns, annual reports, and everything in between. Build a template once in Settings & Apps → Tasks → Templates, then apply it to any client to set up consistent task plans in seconds. This article covers creating client workflow templates, combining them, and applying them to clients.
Who can do this
Section titled “Who can do this”- Company Owners and Company Admins — full template control by default (create, edit, duplicate, delete).
- Company Members — only if a Company Owner or Company Admin grants them permission to manage workflow templates. This is set through member roles and permissions.
- Applying a template to a client requires access to that client (Company Admin/Owner, or a Member with Client Admin permission).
Client workflow templates vs project workflow templates
Section titled “Client workflow templates vs project workflow templates”This article covers client workflow templates — recurring and one-time tasks tied to ongoing client service relationships (monthly bookkeeping, quarterly VAT). They live in Settings & Apps → Tasks → Templates.
For finite project templates (audits, special engagements) tied to a Project status flow, see How to create project workflow templates.
Create a client workflow template
Section titled “Create a client workflow template”You have three ways to create a client workflow template: upload from Excel, build it manually, or duplicate an existing one.
Path: Settings & Apps → Tasks → Templates
Upload from Excel
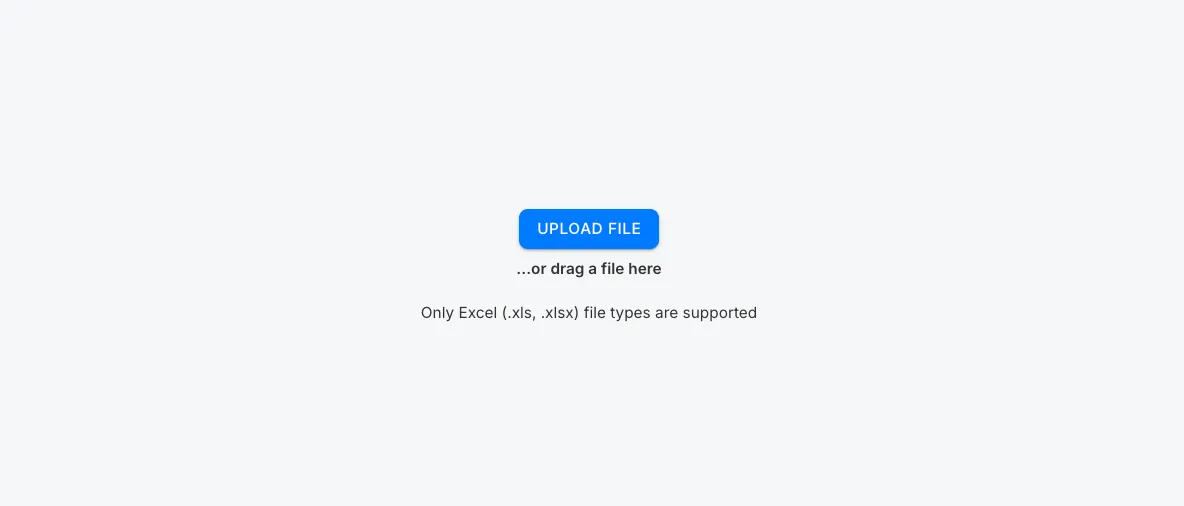
Section titled “Upload from Excel”Upload an Excel file to create a client workflow template in one step.
- Prepare your task template in an Excel file. Download ready-made templates from the Uku accounting templates page.
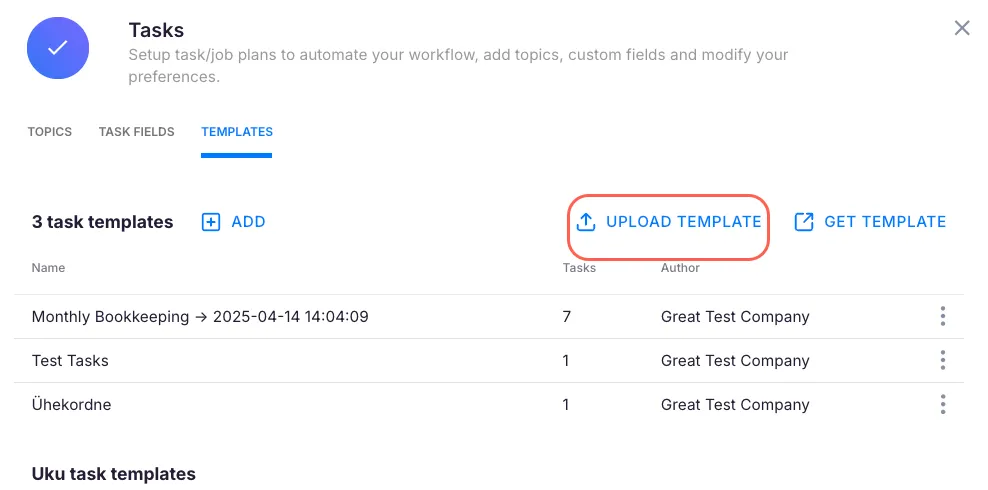
- Click Upload template.
- In the upload window, drag and drop the file or select it from your computer.
- The template appears in your list with the upload date and time.
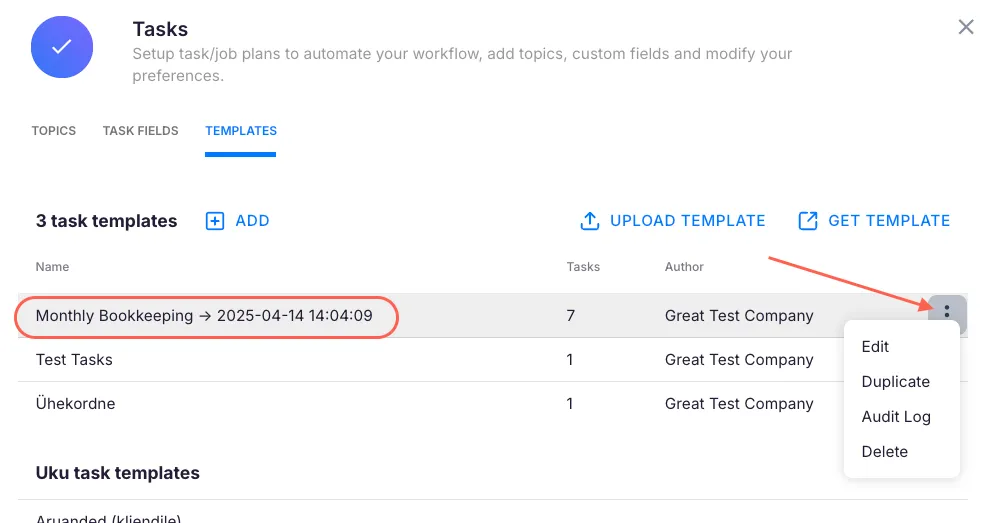
Click the three-dot menu next to any template to rename, duplicate, or delete it.
Build manually
Section titled “Build manually”Build a client workflow template from scratch in the workflow editor, adding tasks one by one.
- In the Templates section, click + Add. Uku opens the New client workflow editor (a full page, not a simple name prompt).
- Enter a name in the Workflow name field at the top. Smaller, modular templates (for example, a separate one for annual reports) are easier to combine than one template that covers everything.
- Add tasks. The task area starts empty (Select workflow), and you have two ways to fill it:
- From scratch — click Add task (top right) and fill in the task details. Repeat for each task. You do not need to specify a client or member.
- From existing tasks — tick a template in the left Workflow templates sidebar to import its tasks, or click existing workflow (or the Client workflows tab) to copy tasks from another client’s workflow.
- Tasks are recurring by default (shown with a purple header). To make one a one-time task, select Does not repeat in its Start/Due date menu.
- Save the template. To abort without saving, click Cancel.
Duplicate an existing one
Section titled “Duplicate an existing one”Duplicate an existing client workflow template to reuse its structure for a new one.
- Open Settings & Apps → Tasks → Templates.
- Click the three-dot menu next to the template and choose Duplicate.
- Uku creates a copy pre-filled with all tasks, recurrence rules, checklists, and dependencies from the original.
- Rename the copy, adjust tasks as needed, and save.
You can also copy tasks from one client’s workflow into another by switching to the Clients tab in the sidebar of the workflow editor and selecting the source client.
The workflow editor layout
Section titled “The workflow editor layout”When you open a template (or build a client workflow), the editor has two main areas:
- Template sidebar (left) — browse and select templates, or copy tasks from existing client workflows.
- Task table (right) — all tasks in the current workflow, grouped by recurrence period (weekly, monthly, quarterly, yearly).
The sidebar has two tabs:
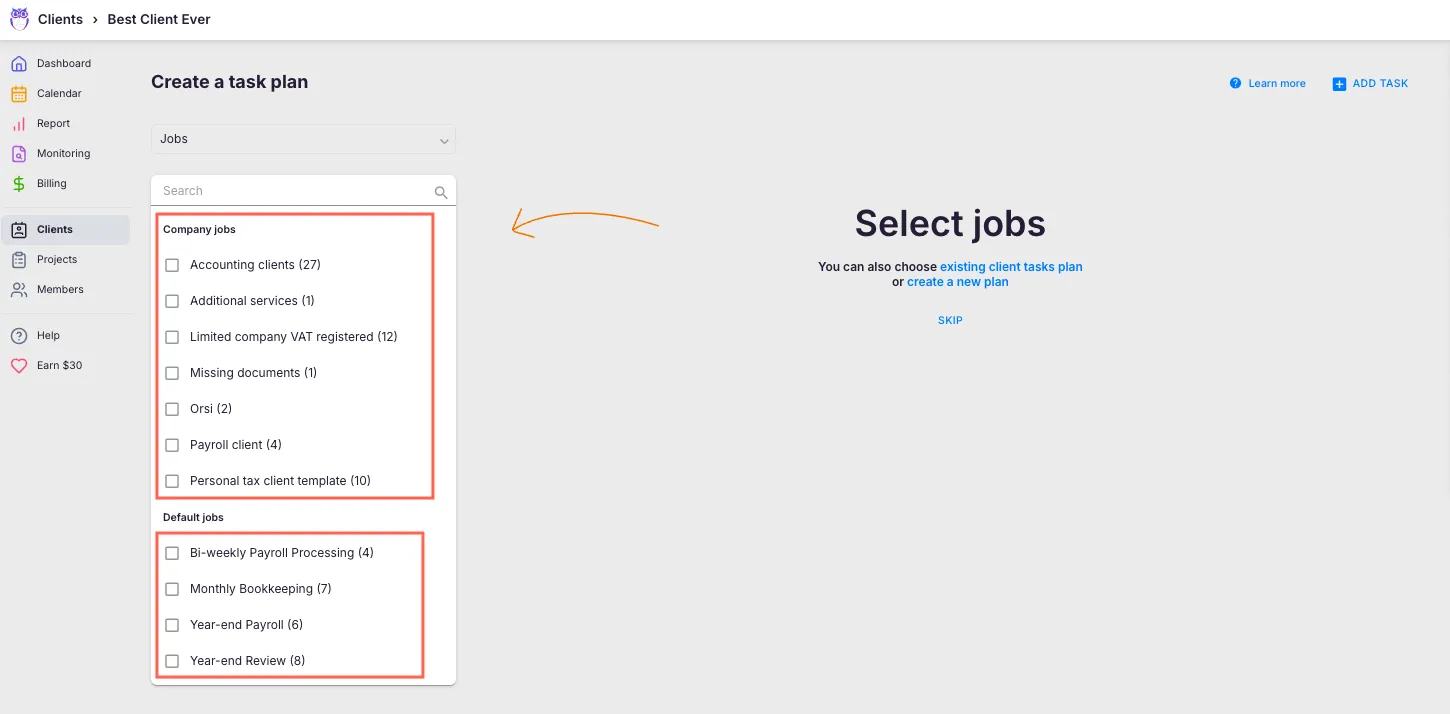
- Templates tab — lists Company templates and built-in example templates (country-specific job templates for accounting, payroll, and tax workflows).
- Clients tab — lets you copy task structures from existing client workflows.
Both tabs include a search field. Click a template name (without ticking) to highlight only that template’s rows in the task table.
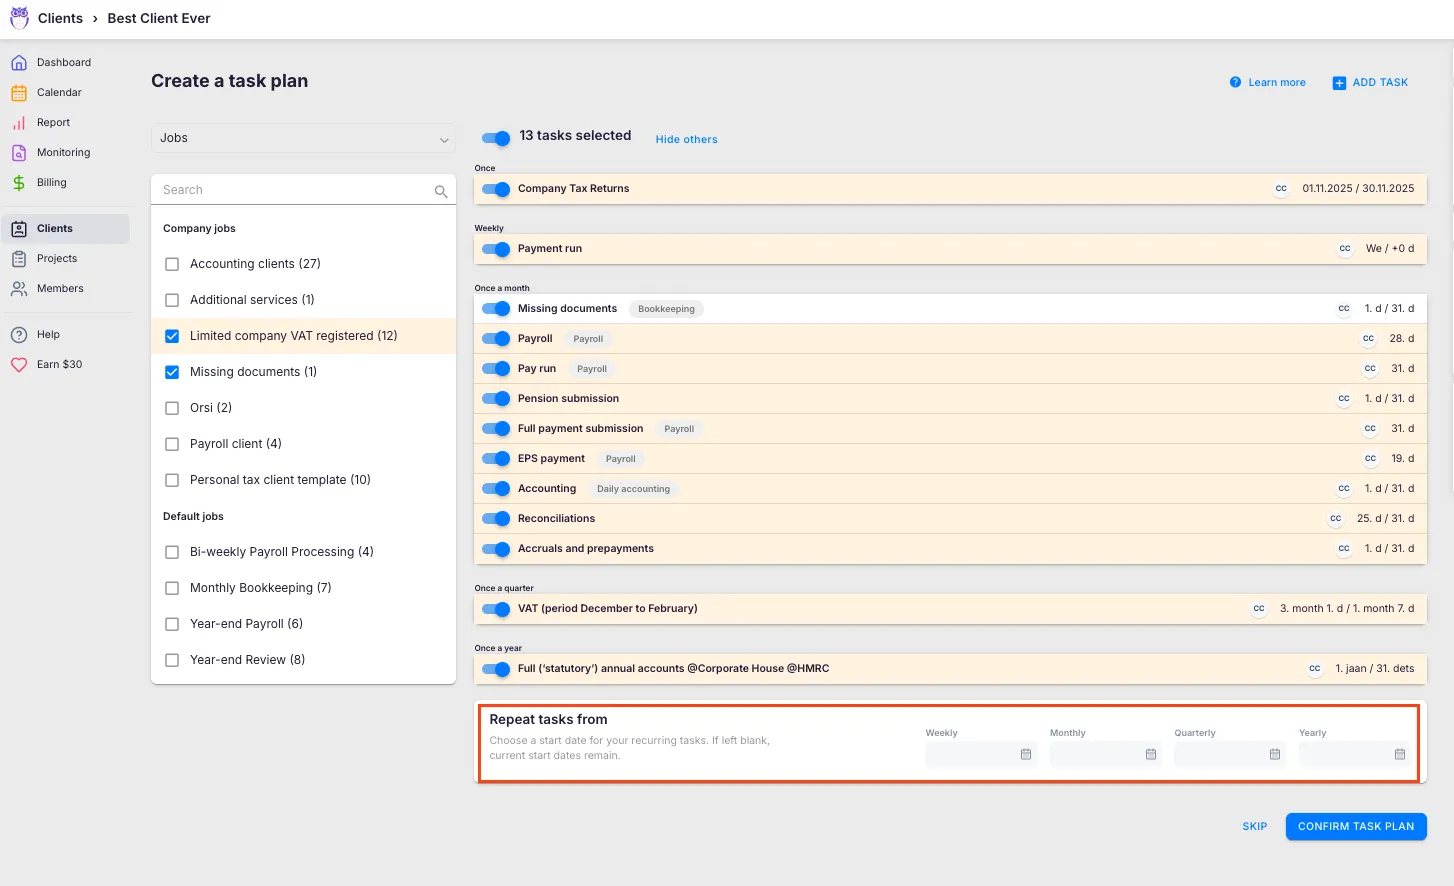
Combine tasks from multiple templates
Section titled “Combine tasks from multiple templates”When building a template or setting up a client’s Workflow, you can pull tasks from several templates into one task table.
- In the workflow editor, find the Workflow templates sidebar on the left.
- Tick the checkbox next to each template you want to include — its tasks are added to the task table.
- Tick additional templates to combine them (for example, “Monthly bookkeeping” + “Quarterly VAT”).
- Untick a template to remove its tasks from the table again.
Each template’s tasks come in with their recurrence rules, checklists, descriptions, topics, estimations, and dependencies intact — dependencies are remapped automatically (if Task B depends on Task A, that relationship carries over).
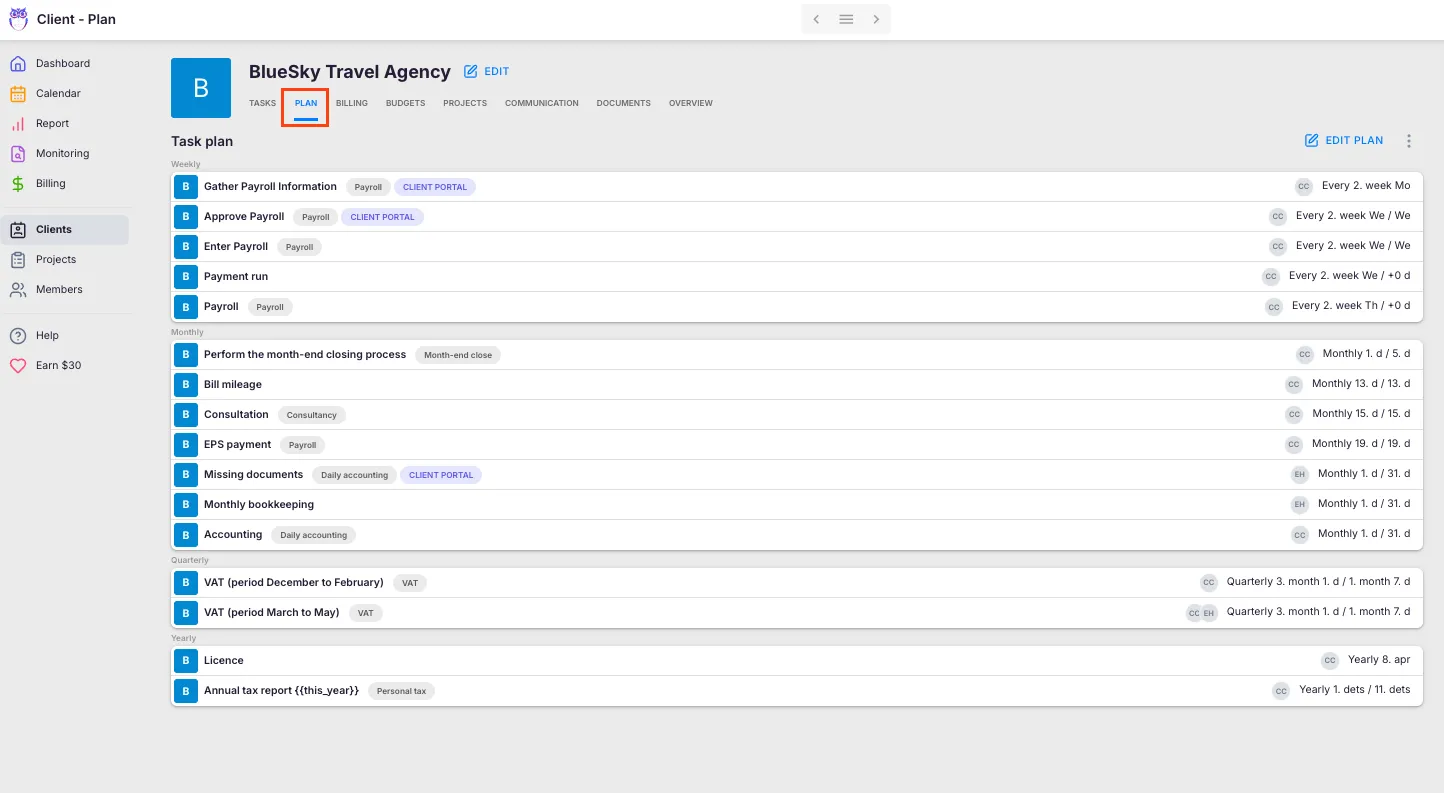
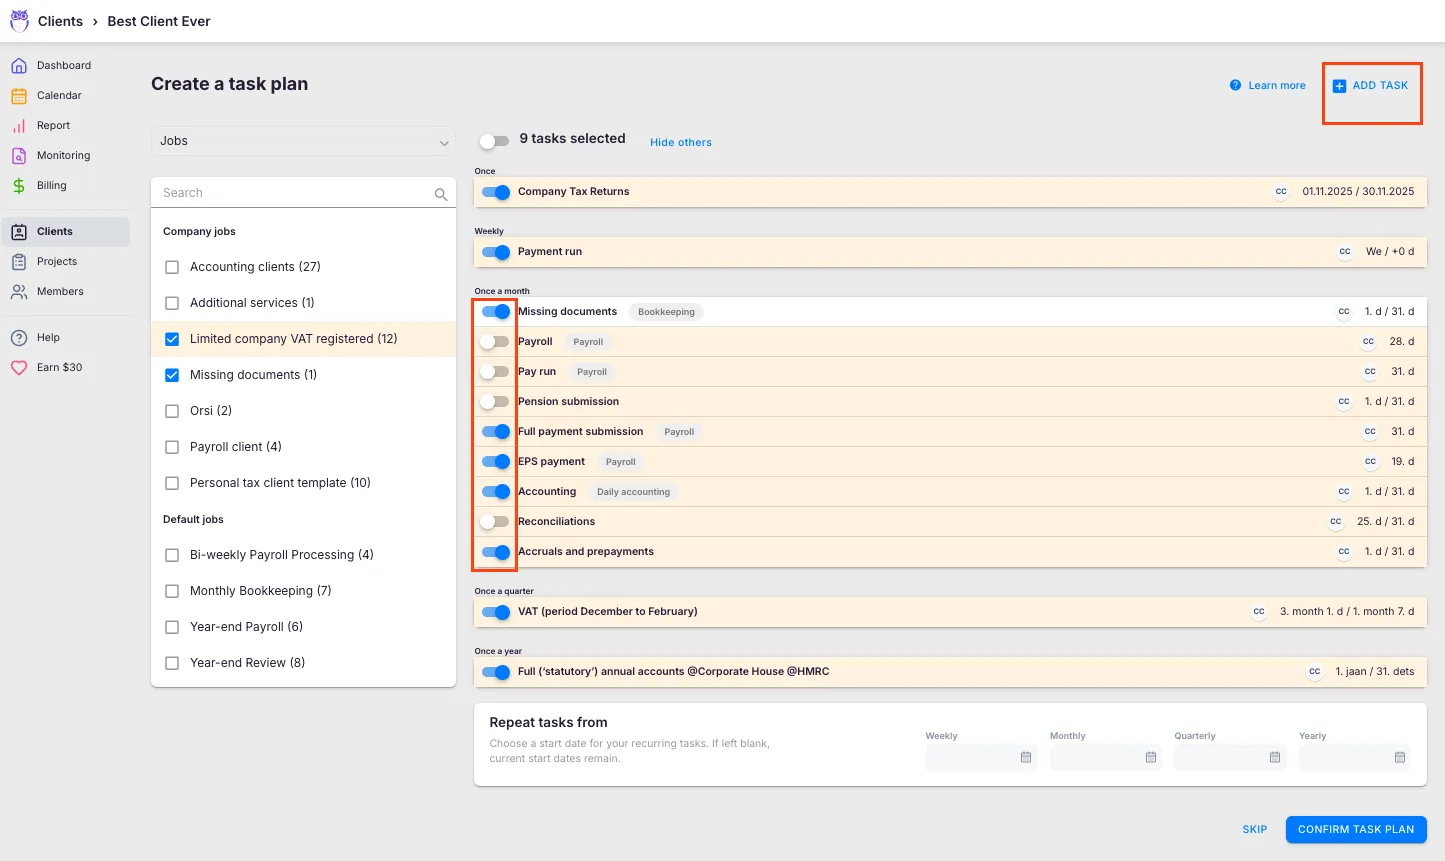
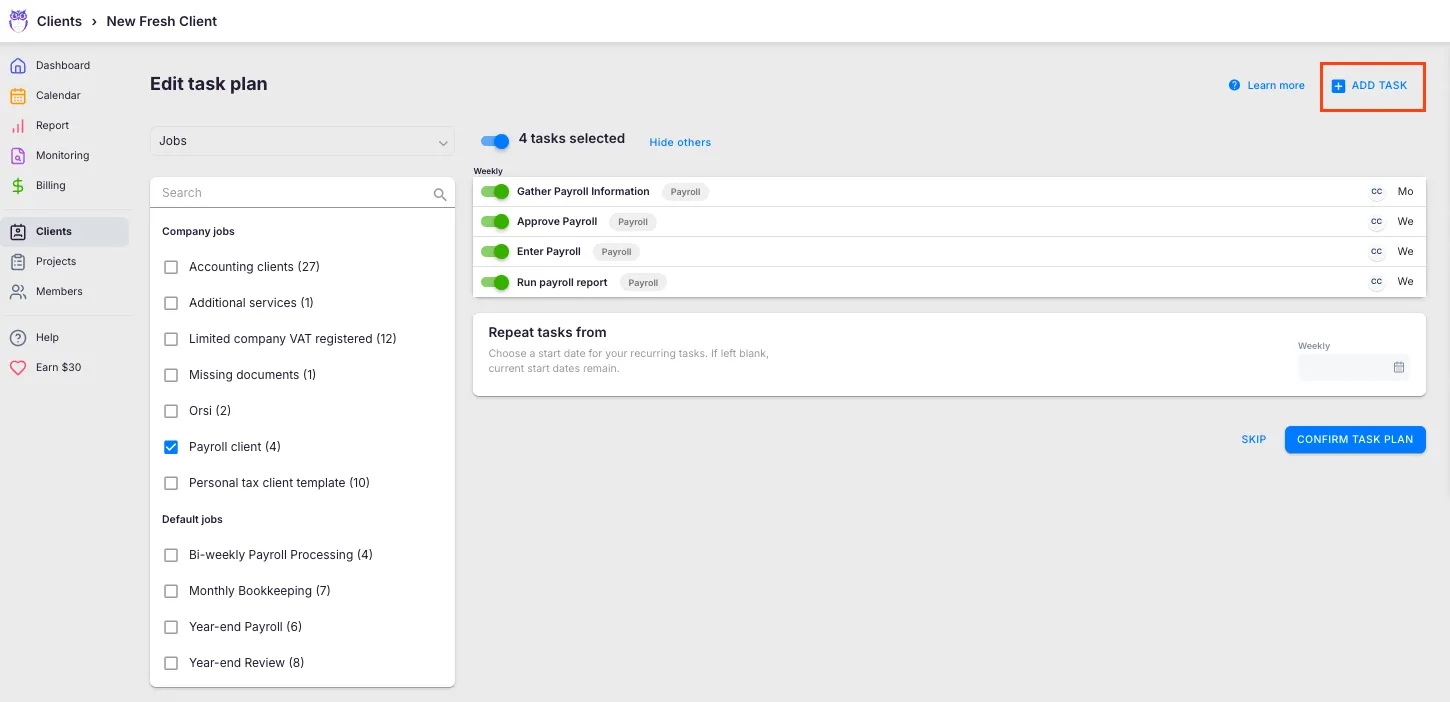
Apply a template to a client
Section titled “Apply a template to a client”Apply a client workflow template to one specific client to set up their recurring task plan. You have three ways to set up a client’s Workflow: apply a template, copy from another client, or add tasks manually. (To assign a template to many clients at once, see Apply a template to multiple clients at once.)
Path: Clients → [client name] → Workflow
Method 1: Apply a template
Section titled “Method 1: Apply a template”- Select Clients from the main navigation.
- Open the client you want to set up.
- Select the Workflow tab from the client navigation.
- Click Choose template.
- Select a template from the list:
- Built-in templates — industry-standard workflows built by accountants
- Your company templates — custom templates created for your practice
- You can combine tasks from multiple templates
- Use the Repeat tasks from selector to set when recurring tasks should begin (see “Set start dates by recurrence period” below).
- Review the task list. Uncheck any tasks you do not need, or click + Add task to add more.
- Click Confirm task plan to finalize.
After confirmation, all selected tasks appear on the client’s profile and on assigned members’ dashboards according to their start dates and recurrence patterns.
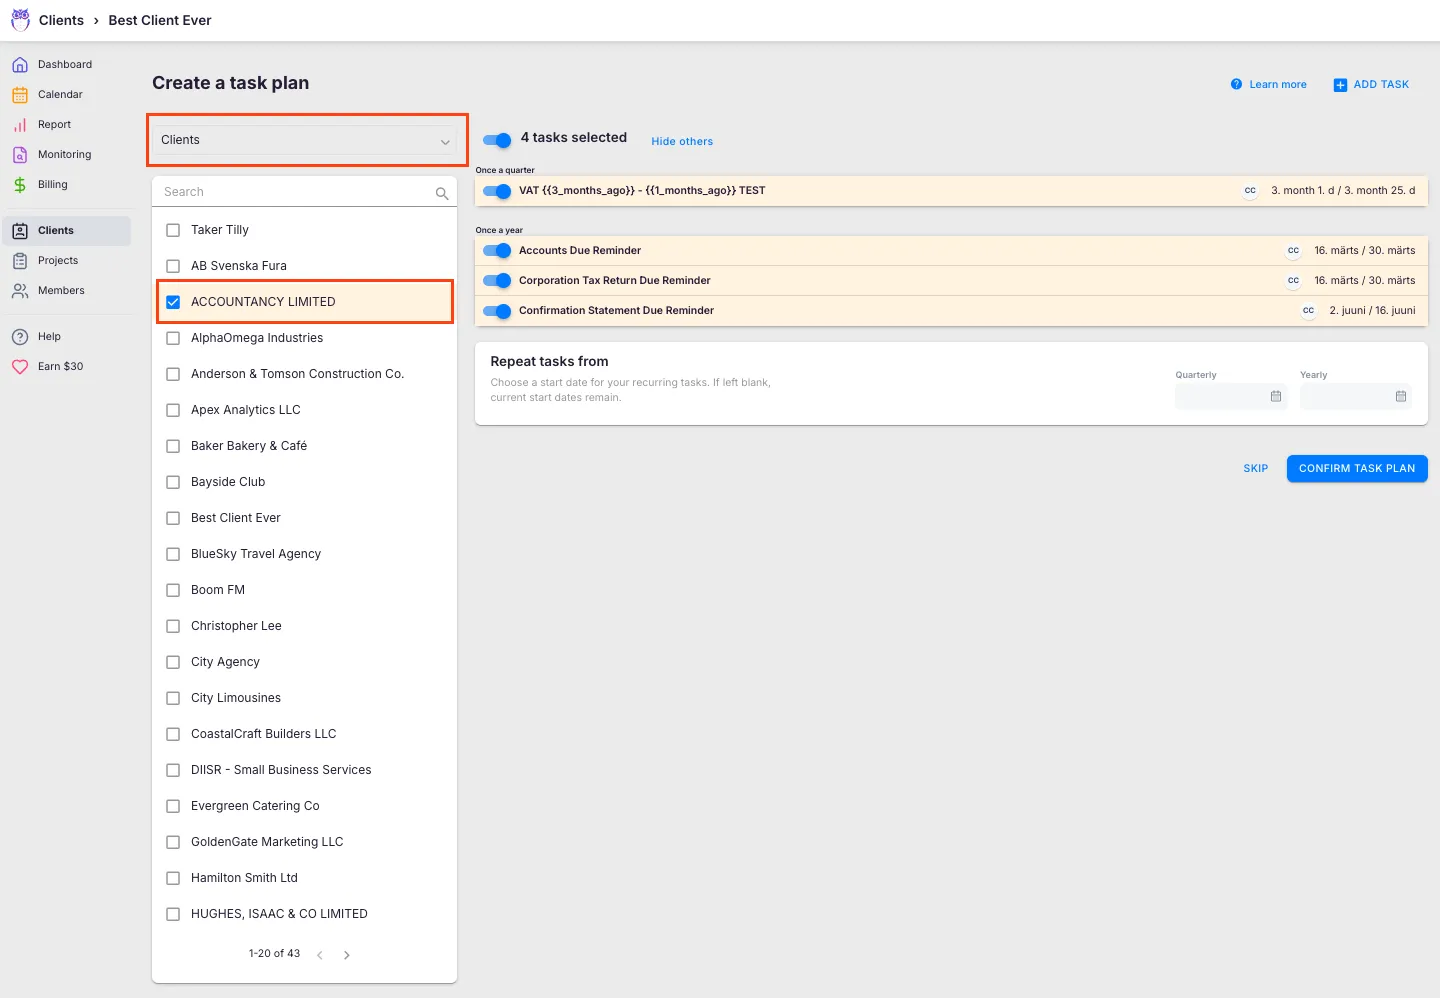
Method 2: Copy from an existing client
Section titled “Method 2: Copy from an existing client”Use this method when you have a similar client whose Workflow you want to replicate, or when setting up multiple clients with identical services.
- Open the client and select the Workflow tab.
- Click Choose template.
- Choose Clients from the template source list.
- Select the client whose Workflow you want to copy.
- Set the Repeat tasks from date.
- Add or remove tasks as needed, then click Confirm task plan.
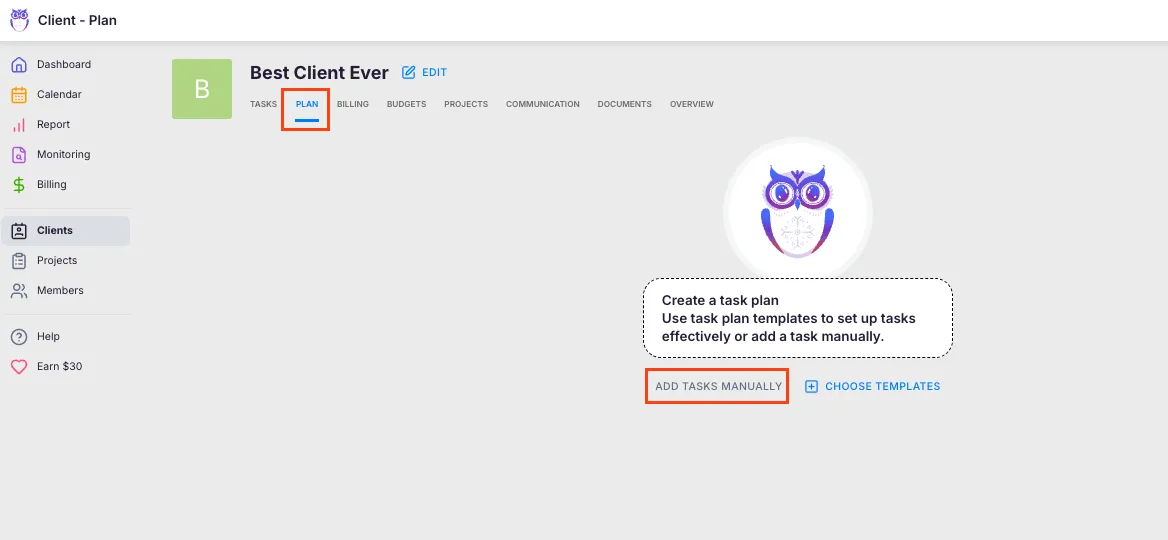
Method 3: Add tasks manually
Section titled “Method 3: Add tasks manually”Use this method when the client has unique requirements that do not fit any template, or when you need just a few specific tasks.
- Open the client and select the Workflow tab.
- Click Add tasks manually.
- Fill in task details: title, description, start and due dates, recurrence pattern, assigned members, topic, checklist items, and custom fields.
- Click Add to save the task.
- Repeat for each additional task.
- Click Confirm task plan when finished.
Set start dates by recurrence period
Section titled “Set start dates by recurrence period”The Repeat tasks from panel appears below the task table when applying a workflow to a client. Set custom start dates for each recurrence frequency:
- Weekly — when weekly tasks should begin repeating
- Monthly — when monthly tasks should begin repeating
- Quarterly — when quarterly tasks should begin repeating
- Yearly — when yearly tasks should begin repeating
Only frequencies that exist in the selected tasks are shown. If you leave a date blank, tasks keep their existing start dates from the template. Setting a date recalculates the first occurrence for all tasks of that frequency.
The Repeat tasks from selector also offers quick presets:
- Start of current month (default)
- Start of next month
- Start of current quarter
- Start of next quarter
- Custom date (calendar picker)
One-time tasks are not affected by the Repeat tasks from date — they use their individually set start dates.
Apply a template to multiple clients at once
Section titled “Apply a template to multiple clients at once”Apply one template to several clients at once from the client list, instead of opening each client’s Workflow individually.
Path: Clients
- Select the clients you want to assign the template to from the client list.
- Click the Workflow bulk action to open the Edit plan dialog.
- Choose Add (append the template’s tasks to each client’s existing plan) or Replace (swap each client’s plan for this template).
- Choose the template from the list and save.
This is the fastest way to set up the same template across many clients during onboarding waves or service-package changes.
Add tasks to an existing Workflow
Section titled “Add tasks to an existing Workflow”After confirming a Workflow, you can still add or remove tasks at any time.
Add tasks in bulk from templates
Section titled “Add tasks in bulk from templates”- Go to the client’s Workflow tab and click Edit plan.
- Select + Add tasks (plural).
- Choose tasks from your templates.
- Use the Repeat tasks from dropdown to set when these new tasks begin.
- Click Confirm.
Add an individual task
Section titled “Add an individual task”- Go to the client’s Workflow tab and click Edit plan.
- Select + Add task (singular).
- Fill in task details and set the recurrence.
- Click Add, then Confirm task plan.
After confirming the Workflow
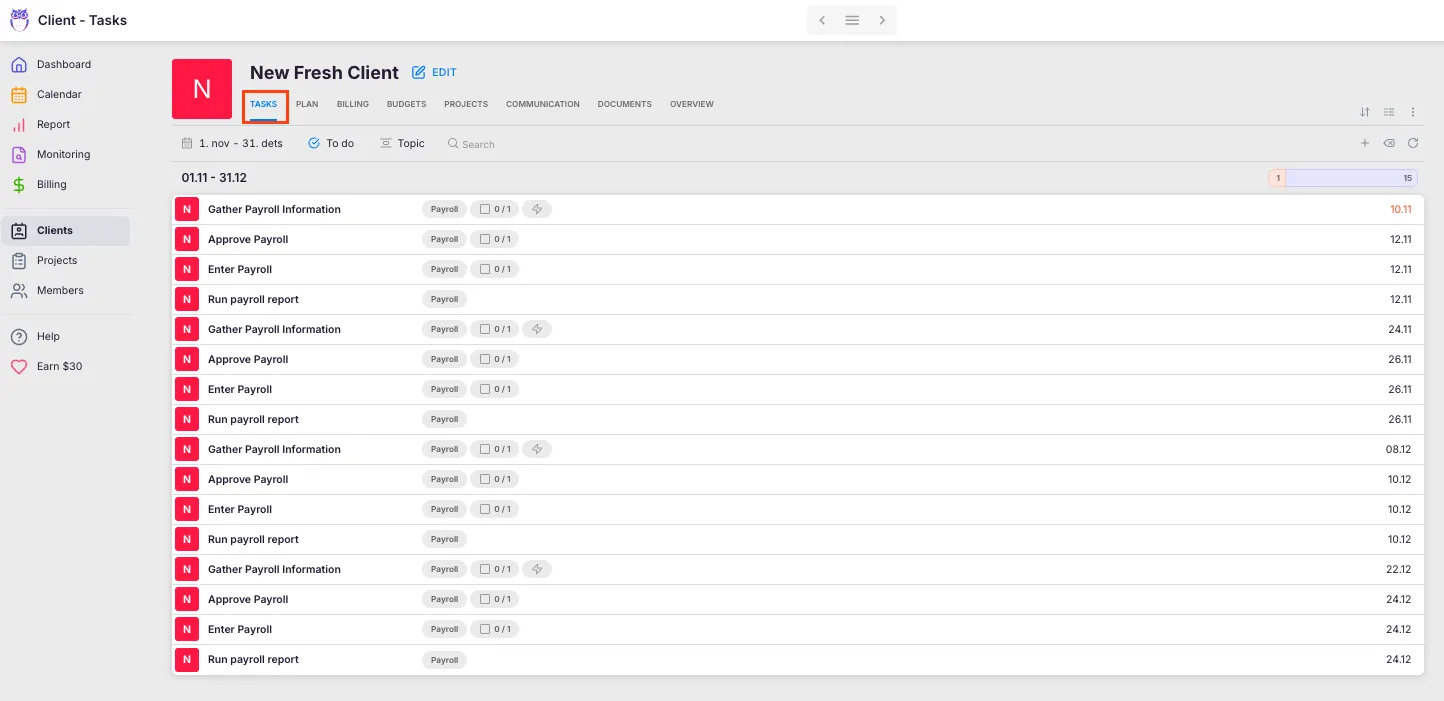
Section titled “After confirming the Workflow”- Recurring tasks generate on dashboards according to their start dates. Future occurrences are created automatically.
- One-time tasks appear immediately on assigned members’ dashboards.
- The workflow plan lives under the client’s Workflow tab — edit, add, or remove tasks there at any time.
- Editing the Workflow affects future task generation only — tasks already on the dashboard are not changed.
- Task order — On the Dashboard, tasks sort by due date, not by their order in the template. To force a sequence, prefix task names (for example “1. …”, “2. …”) or reorder them in the Calendar view.
- Removing a recurring task from a client — uncheck it in the client’s Workflow editor, or delete the template from the task’s three-dot menu. See Recurring tasks.
You can also see the tasks the workflow generates on the client’s Tasks tab (the default view when you open a client), where you can follow their progress:
To push template improvements to all clients already using a template, see How to update client tasks from template changes.
Next steps: team members now log time against these tasks, and the work flows into billing for invoicing.
Troubleshooting
Section titled “Troubleshooting”Excel upload fails or template appears empty
Section titled “Excel upload fails or template appears empty”Ensure your Excel file matches the expected format. Download a sample from the Uku accounting templates page and compare the column structure. Common issues include missing headers, incorrect date formats, or unsupported file types (use .xlsx).
Template list is empty when creating a Workflow
Section titled “Template list is empty when creating a Workflow”Verify that templates have been added under Settings & Apps → Tasks → Templates. If templates exist but do not appear, check that they are saved under the company account (not a personal account) so all team members can see them.
Built-in (Uku-provided) templates have disappeared
Section titled “Built-in (Uku-provided) templates have disappeared”Built-in workflow templates (client onboarding, employee on/offboarding, common accounting tasks) can be hidden company-wide via a setting. They cannot be deleted permanently — only hidden. To restore them:
- Go to Settings & Apps and open the Company app.
- Find the Hide uku workflows option.
- Turn it off.
Built-in templates immediately become visible again across the company.
Template tasks default to recurring when you need one-time tasks
Section titled “Template tasks default to recurring when you need one-time tasks”By default, all template tasks are recurring. To create a one-time task, open the task within the template and select Does not repeat from the Start/Due date menu.
Why don’t my workflow tasks appear on the dashboard?
Section titled “Why don’t my workflow tasks appear on the dashboard?”Confirm that the Workflow was finalized by clicking Confirm task plan. Also check that the task start dates have been reached and that the assigned member is active.
Recurring tasks start from the wrong date
Section titled “Recurring tasks start from the wrong date”Review the Repeat tasks from setting used during Workflow creation. If incorrect, click Edit plan, adjust the start date for the affected recurrence frequency, and re-confirm.
Copied Workflow includes tasks the client does not need
Section titled “Copied Workflow includes tasks the client does not need”After copying from another client, uncheck any tasks that do not apply before confirming. You can always click Edit plan later to add or remove tasks.
Can I duplicate a client’s whole workflow to another client?
Section titled “Can I duplicate a client’s whole workflow to another client?”There’s no single “duplicate workflow” button, but you can copy one. Open the target client’s Workflow tab, click Choose template, switch to the Clients source, and pick the client whose workflow you want — see Method 2: Copy from an existing client. To reuse a client’s workflow as a saved template instead, build a new template and pull their tasks in via the Clients tab. Either way, adjust the recurrence start dates for the new client before confirming.
Cannot edit a template — no edit permissions
Section titled “Cannot edit a template — no edit permissions”By default, only Company Owners and Company Admins can edit templates. If you need access as a Member, ask a Company Owner or Admin to grant you the workflow-template management permission. It is set through member roles and permissions.
Task dependencies are not carrying over from a combined template
Section titled “Task dependencies are not carrying over from a combined template”Dependencies are remapped automatically when selecting a template. If a dependency is missing, check that both tasks (the prerequisite and the dependent task) were included from the same template source.