Uku has a built-in timer on every task. Start it when you begin work, pause it when you stop, and correct or add entries manually afterward. All your tracked time rolls up into reports and feeds your Flextime balance.
Who can do this
Section titled “Who can do this”- All active team members can track time on tasks assigned to them.
- Company Admins can view and manage time entries for all team members on a task.
- Company settings can restrict time management for regular Company Members — contact your Company Admin if the timer controls are read-only for you.
Starting the timer
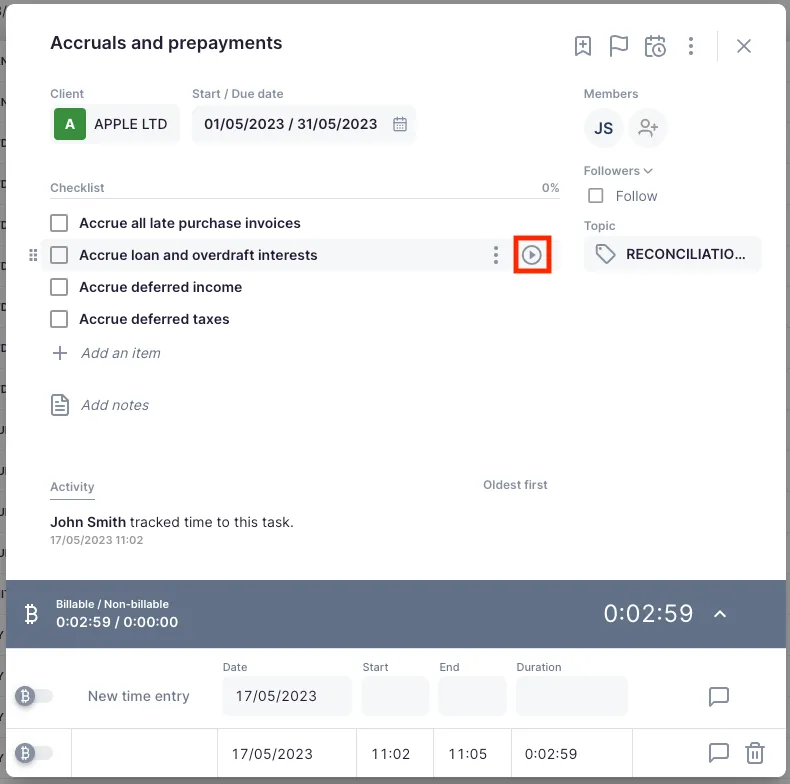
Section titled “Starting the timer”Open any task and click the play button next to the time display. The timer starts immediately and the button changes to a pause icon. The time display updates in real time.
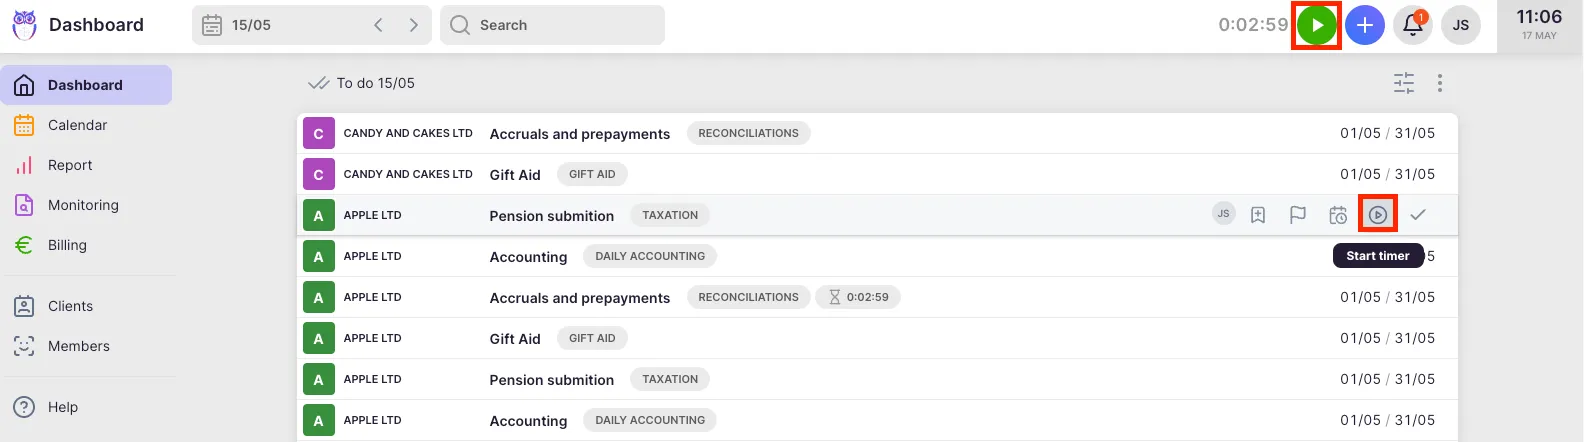
You can also start the timer without opening the task: hover over any task row in the dashboard or task list to reveal the timer controls, then click the play button.
When you start a timer on a new task, any currently running timer is automatically paused. Only one timer can run at a time.
The global timer widget
Section titled “The global timer widget”When a timer is running, a timer widget appears in the application header bar. It shows the total tracked time for the active task and is visible from any page in Uku — so you never need to navigate back to the task just to check the timer.
The widget displays:
- Elapsed time in hours, minutes, and seconds
- A play/pause button to control the timer without leaving your current page
Click the time display in the widget to open the task directly. Hover over the widget to see a tooltip with the task title, client name, and topic.
Pausing the timer
Section titled “Pausing the timer”Click the pause button on the task (or in the header widget) to pause. This saves the current time entry with the accumulated duration. There is no separate “stop” action — pausing preserves your tracked time as an entry you can edit afterward.
Manual time entries
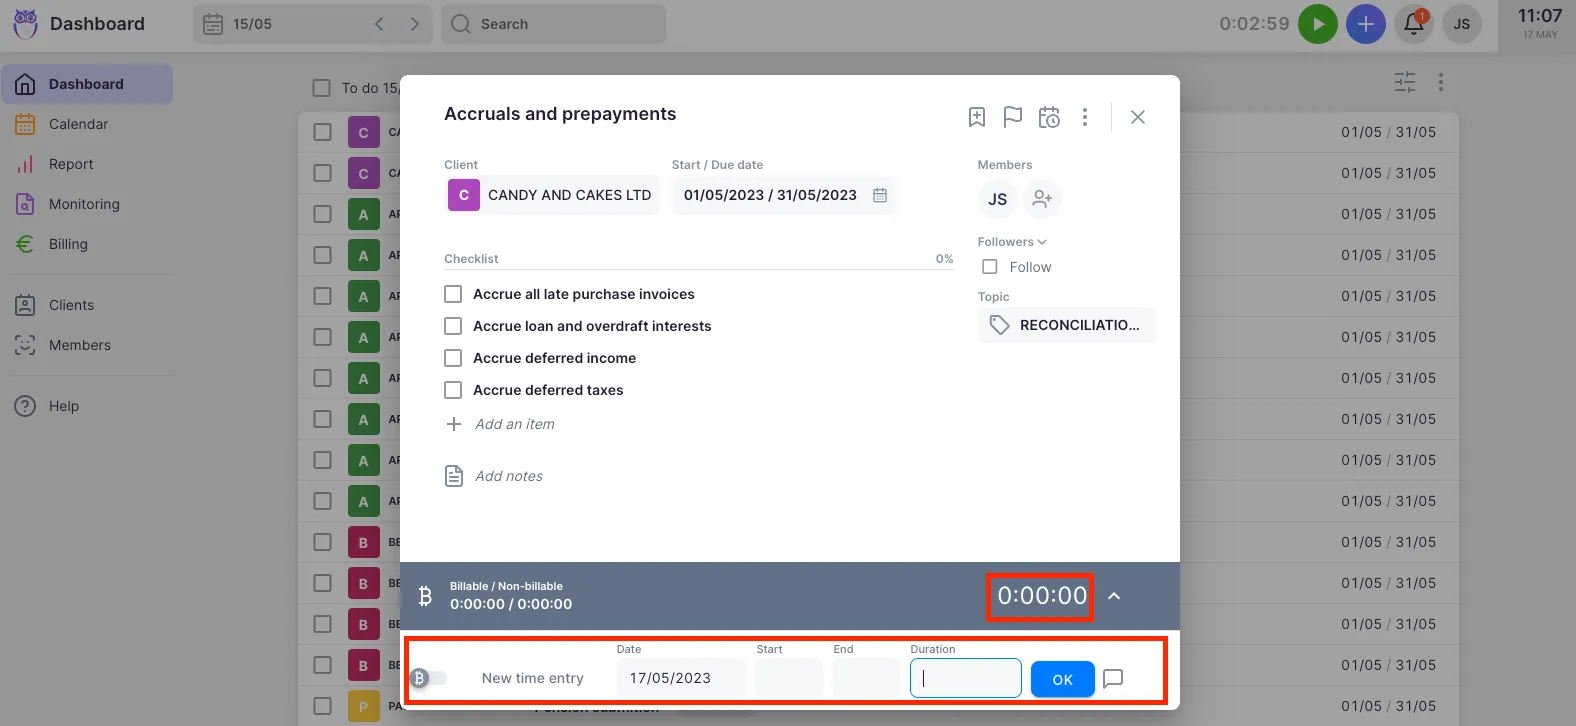
Section titled “Manual time entries”You do not need to use the timer. Open a task and click the time display to expand the timesheet panel. The last row is always an empty entry ready for input.
Each time entry row has these fields:
- Billable toggle (left side) — marks the entry as billable or non-billable
- Date — defaults to today; click to pick a different date
- Start time — when work began
- End time — when work ended
- Duration — calculated from start/end, or enter directly
You can fill in any combination of fields. If you enter only a duration, Uku sets the start and end times automatically. If you enter start and end, Uku calculates the duration. If you enter start and duration, Uku sets the end time.
Click the checkmark button on the row to save. A new empty row appears automatically after saving.
Continuing from a previous entry
Section titled “Continuing from a previous entry”When adding a new time entry, click the Start field to see a suggestion to continue from where your last entry ended. Clicking the suggestion fills in the start time automatically — useful for logging consecutive work blocks without gaps.
Adding a description to a time entry
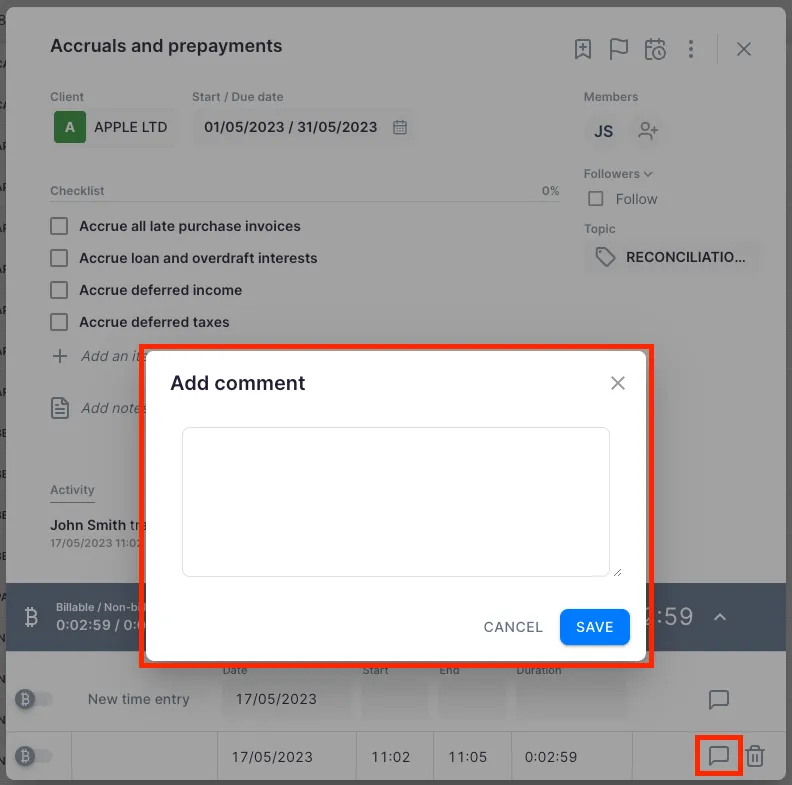
Section titled “Adding a description to a time entry”Click the comment icon (speech bubble) next to any time entry to open the description field. Type your note; it saves when you close the field. Entries with descriptions show a filled comment icon — hover over it to preview the text.
Billable vs. non-billable time
Section titled “Billable vs. non-billable time”Every time entry has a billable toggle. The default billable status comes from two sources:
- Company billing settings — the company-level default.
- Topic override — if the task belongs to a topic, the topic’s billable setting takes priority over the company default.
You can override the default on any individual entry by clicking the billable toggle. Billable time counts toward client billing; non-billable time is tracked but not included on invoices.
Adding time to multiple tasks at once
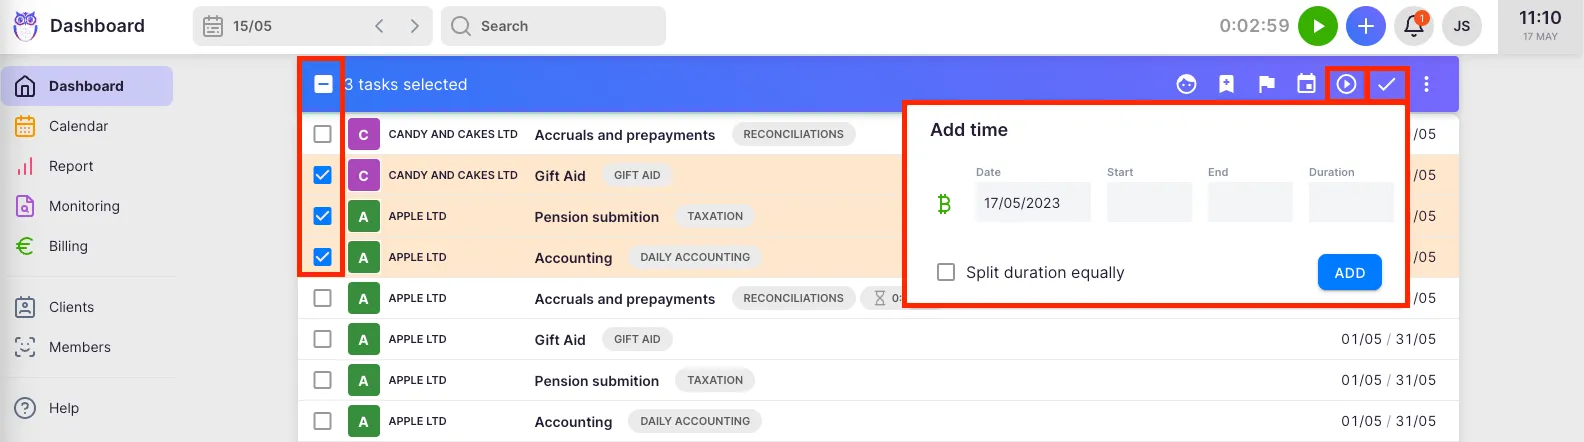
Section titled “Adding time to multiple tasks at once”- Click the multi-select icon (two checkmarks) above the task list on the dashboard.
- Select the tasks you want to add time to.
- Click the Add time icon in the action bar.
- Enter the total time and choose whether to apply it equally to all tasks or as the same amount on each task.
Time estimation
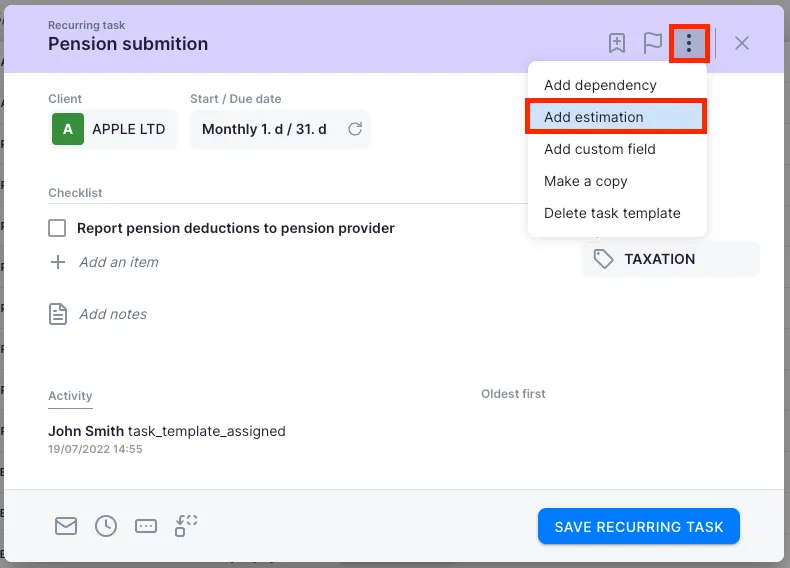
Section titled “Time estimation”If you know in advance how long a task will take, add an estimation:
- Open the task.
- Click the more options icon (three dots).
- Select Add estimation.
- Enter the estimated duration.
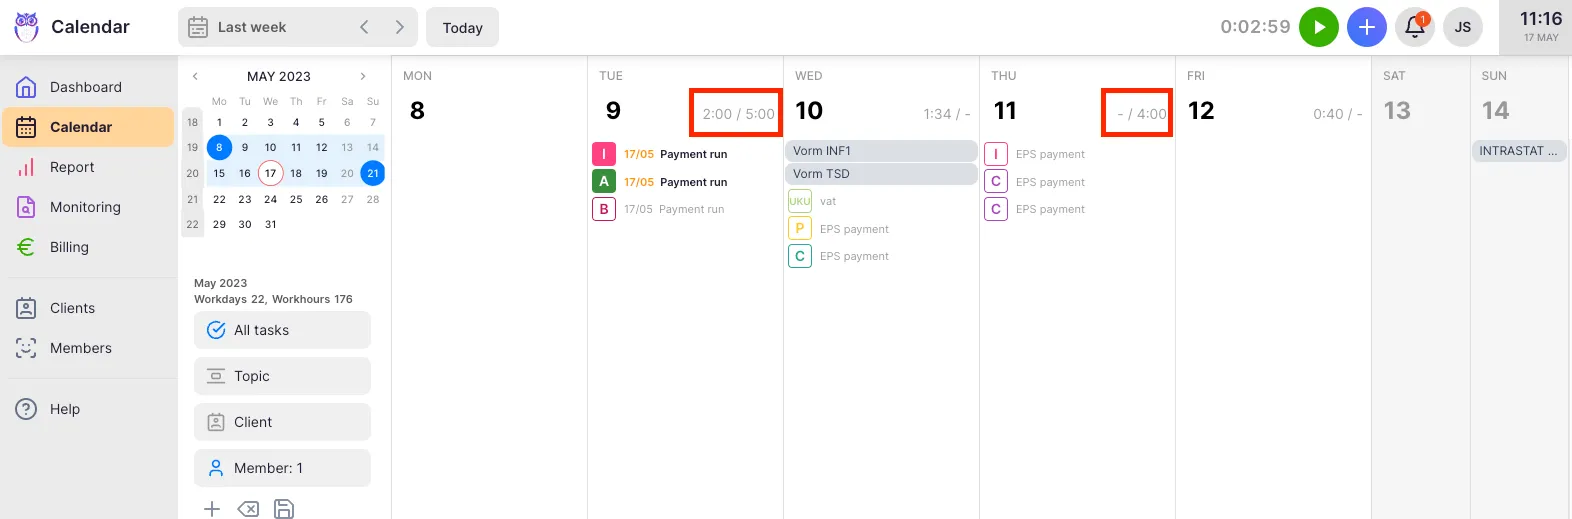
Estimations are visible in the Calendar view under each day’s summary. If a task is marked done with no tracked time, Uku can automatically convert the estimation into tracked time — enable this in Settings & Apps → Tasks settings.

Troubleshooting
Section titled “Troubleshooting”The timer shows excessive hours after being left running
Section titled “The timer shows excessive hours after being left running”Click the time display on the task to open the timesheet panel. Find the entry with the incorrect end time and click into the End or Duration field to correct it. Click the checkmark to save.
Time entries appear as non-billable when they should be billable
Section titled “Time entries appear as non-billable when they should be billable”Check two places: (1) the task’s topic — if the topic is set to non-billable, it overrides the company default. (2) The company billing settings — confirm the default is set to billable. You can always override on individual entries by clicking the billable toggle.
The timer controls are read-only
Section titled “The timer controls are read-only”Your company settings may restrict time management for Company Members. Contact your Company Admin to check whether the time_management_disabled_for_users setting is enabled, and ask them to adjust entries on your behalf if needed.
Cannot see the timer widget in the header
Section titled “Cannot see the timer widget in the header”The widget only appears when a timer is actively running (or paused on an unfinished task). If you started the timer on a different device or browser, try refreshing the page to sync the state.
My calendar shows different total hours than the report
Section titled “My calendar shows different total hours than the report”This usually happens when time has been tracked across multiple Uku accounts (for example, a personal trial account in addition to your company account). The calendar surfaces time from every account you have access to, while Reports show only the time tracked in the currently selected account.
When generating a report, use the account filter to confirm you are looking at the right account, or switch accounts and re-run the report to see the missing time.
My weekly hours look wrong despite a custom Flextime agreement
Section titled “My weekly hours look wrong despite a custom Flextime agreement”Custom agreements only apply to weeks they fully cover. If a custom agreement starts or ends mid-week, Uku falls back to the company-wide weekly agreement for that partial week. To make a custom agreement apply to a specific week, ensure it spans the full week (Monday through Sunday).