
Monitoring lets you define expected work commitments for each client — total hours, topic-specific hours, or custom field volumes — and track whether those commitments are being met each period. Use it to spot under-serviced clients, identify scope creep, and support pricing conversations with data.
If you are setting up Monitoring for the first time at a small firm, see Setting up Monitoring for a small firm for a pragmatic rollout sequence — which clients to monitor first, which targets to set, and what to skip.
Who can do this
Section titled “Who can do this”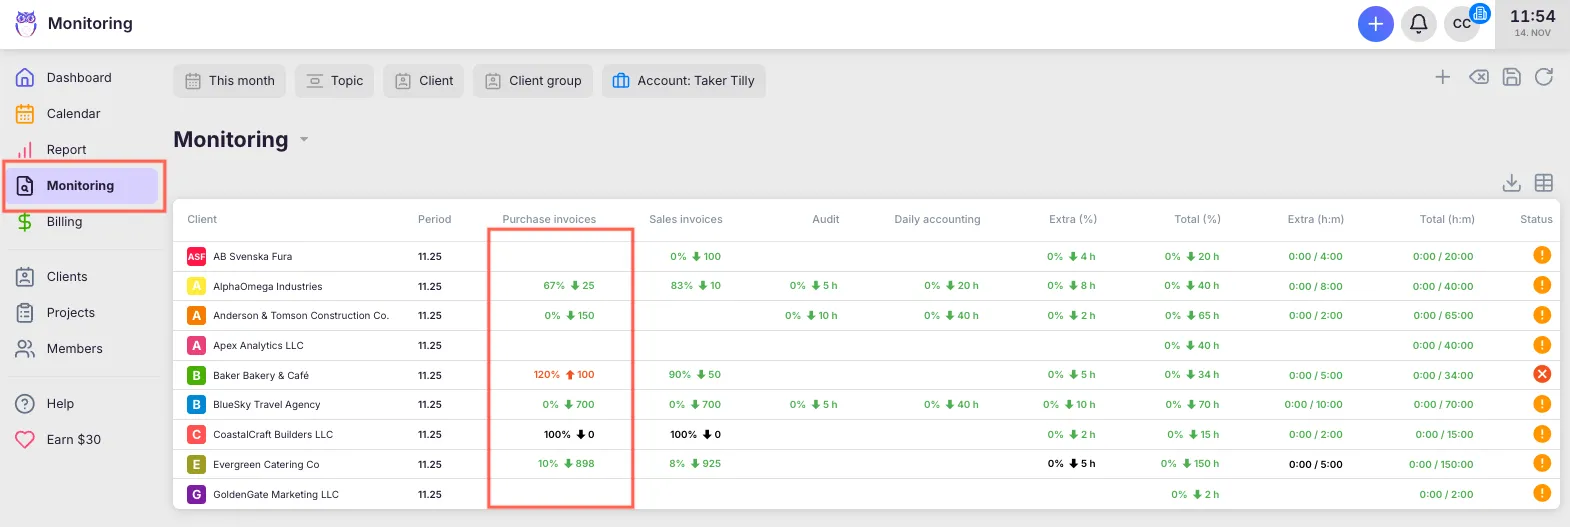
- Company Admins and Company Owners can activate Monitoring, configure targets for all clients, and view all client data.
- Company Members with Client Admin permission can view and edit targets for their assigned clients.
- Requires the Monitoring app to be activated in Settings & Apps.
- Available on all paid plans (Solo, Team, and Elite).
Activating Monitoring
Section titled “Activating Monitoring”- Select Settings & Apps from the main navigation menu.
- Click the Monitoring app card.
- Click Activate and confirm.
Monitoring now appears in the main navigation menu.
The Monitoring list
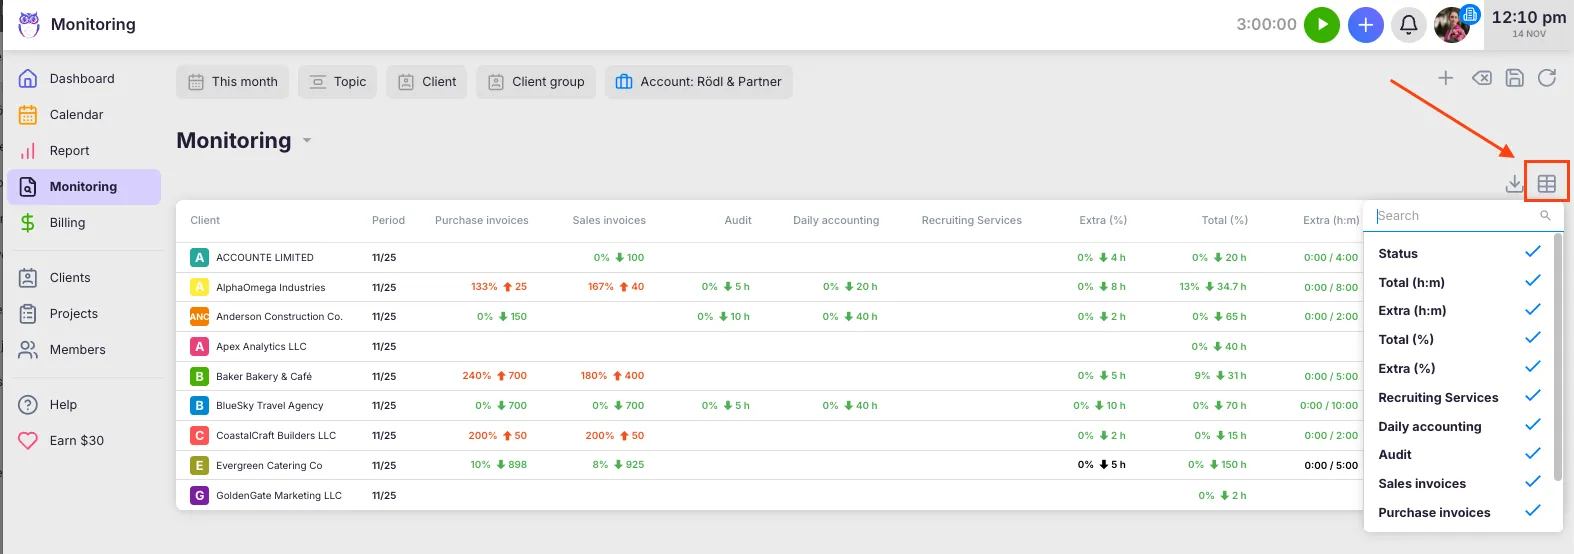
Section titled “The Monitoring list”Navigate to Monitoring from the main menu. The list shows one row per client with their current monitoring status for the selected period.
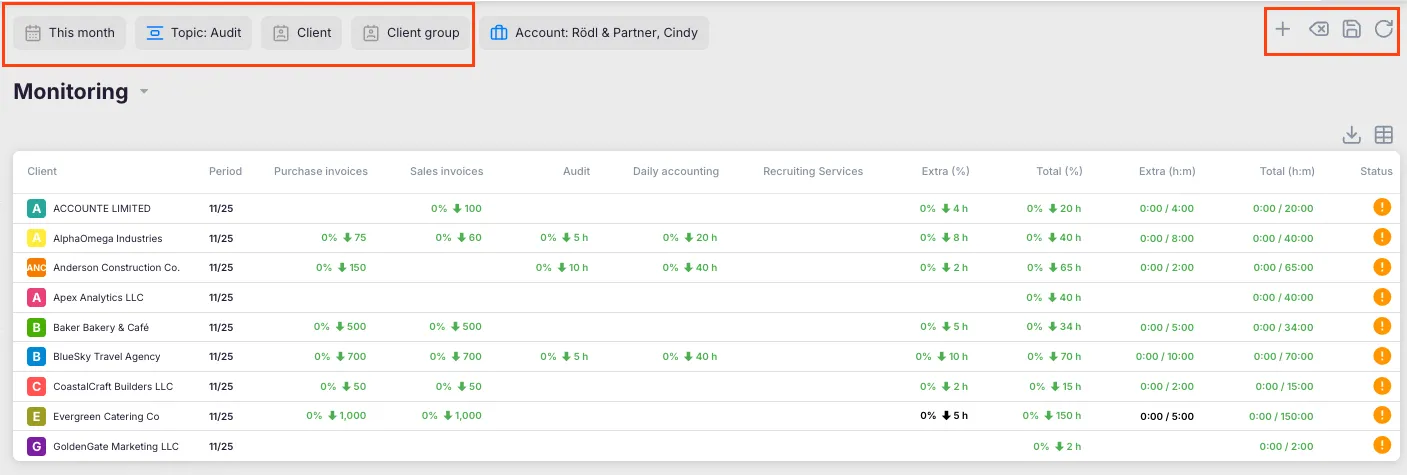
Filter bar
Section titled “Filter bar”- Company — which company’s clients to show (relevant for multi-company setups).
- Period — which monitoring period to display. Defaults to the current month. Monthly periods go 13 months back and 3 forward; weekly periods go 60 weeks back and 15 forward.
- Frequency — toggle between Monthly and Weekly. These are independent tracking tracks.
- Client — filter to one or more specific clients.
- Status — filter by monitoring status (On track, Under, or Over).
Status indicators
Section titled “Status indicators”| Status | Meaning |
|---|---|
| On track (within) | Actual is within the ± range of the target |
| Under | Actual is below target minus the range — shown in green |
| Over | Actual is above target plus the range — shown in red |
| No target | No target set for this period |
The row’s overall status reflects the worst status across all monitoring types for that client.
Setting targets
Section titled “Setting targets”Monitoring targets are period-specific, but they carry forward automatically. When you open a new period, the most recent active setup for that client is reused — you only configure the period when something changes (new topic, new volume, new client agreement). Use Copy from… if you want to deliberately reuse a target from a different past period instead of the most recent one.
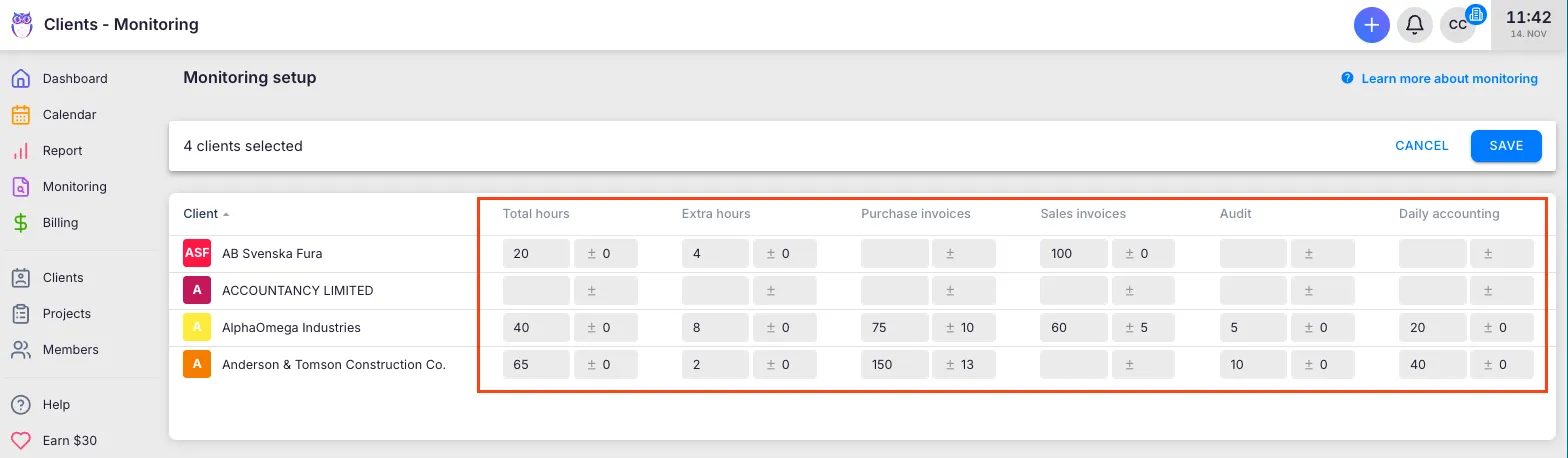
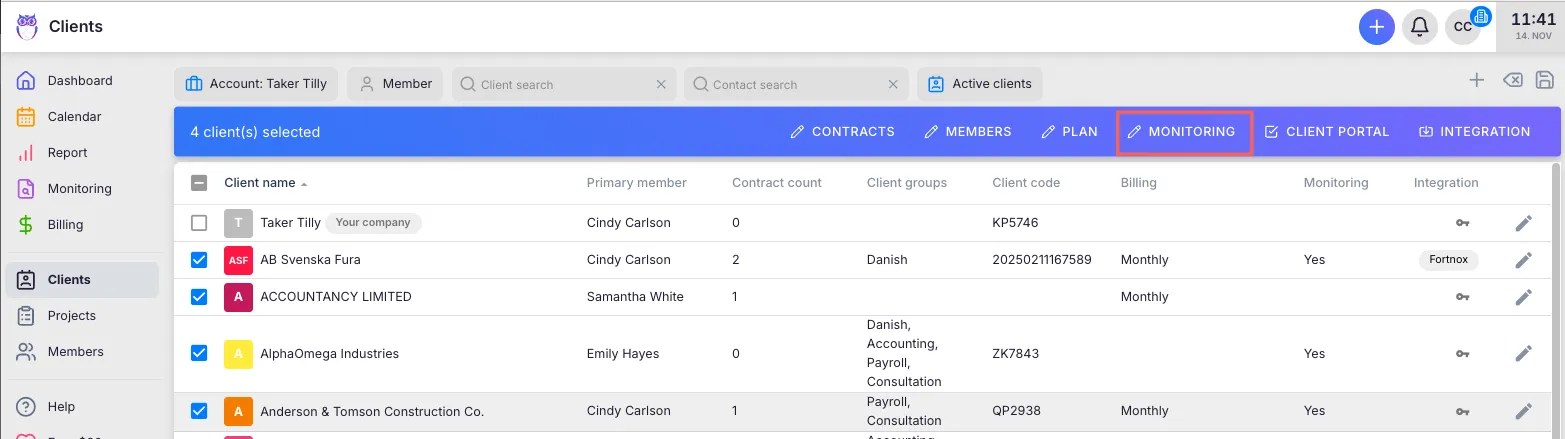
- In the monitoring list, click the edit icon on the client’s row to open Monitoring setup for that client — or click Edit at the top right to open the same editor with every client listed, which is the fastest way to set up many clients at once.
- Select the period you want to configure using the period selector in the editor header.
- Enter the target value for each monitoring type (Total time, Extra time, Topic, or Custom field).
- Optionally enter a ± range value — work within this range shows as On track.
- Click Save or press Ctrl+S / Cmd+S.
To remove a target, clear both the value and range fields and save.
Copying targets from a previous period
Section titled “Copying targets from a previous period”If a client’s targets are the same as a previous period, use Copy from… instead of re-entering values manually. The button appears only while the selected period has no saved targets — once values exist, including ones that carried forward automatically, it is hidden and you edit the figures directly instead.
- In the monitoring editor, select the period you want to set up.
- Click Copy from… in the editor header.
- Select the source period.
- Adjust any values if needed. A Copied — not yet saved indicator appears to remind you changes are pending.
- Click Save.
What you can monitor
Section titled “What you can monitor”- Total time — total tracked hours across all topics for the client.
- Extra time — hours logged as extra work for the client.
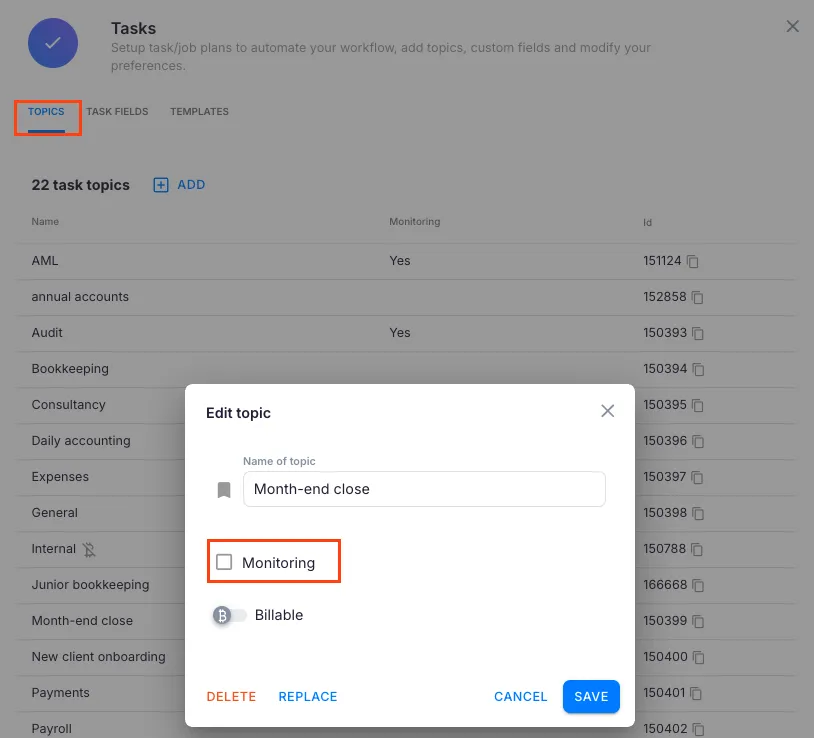
- Topic — hours tracked under a specific topic. Only topics with the Monitoring checkbox enabled appear as options. Enable this in Settings & Apps > Tasks > Topics.
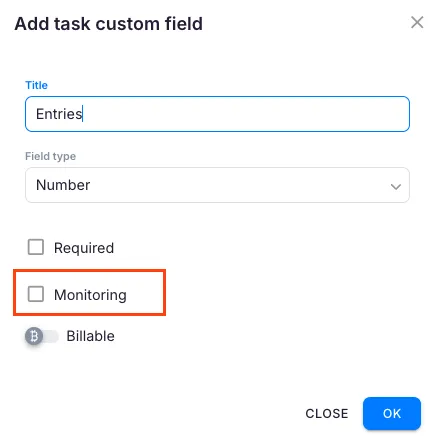
- Custom field — quantity values from a specific numeric custom field. Only Number-type fields with the Monitoring checkbox enabled appear. Enable this in Settings & Apps > Tasks > Task Fields.
Exporting the monitoring view
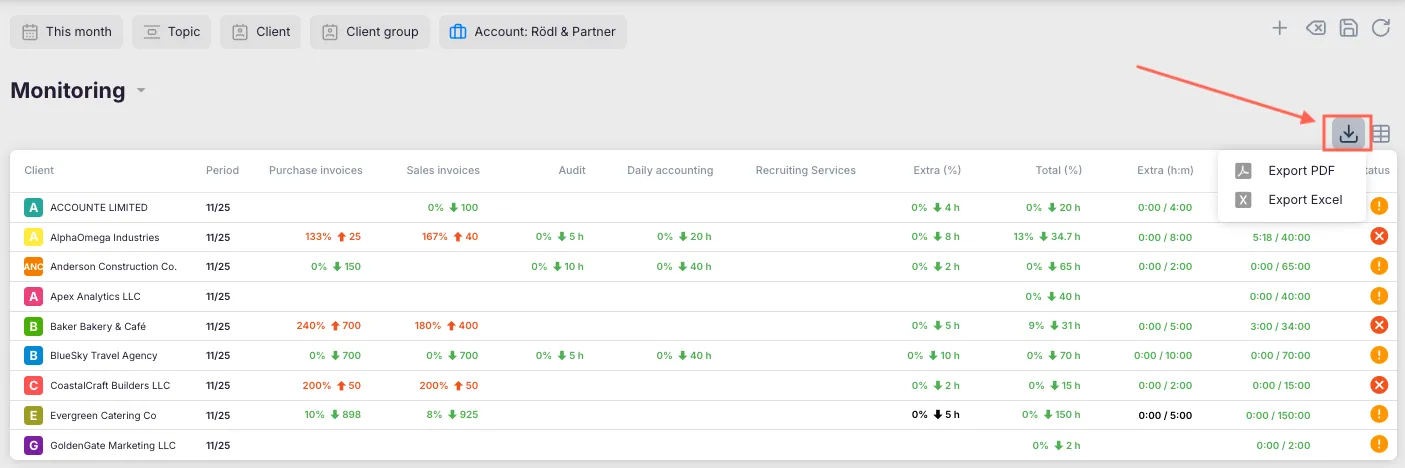
Section titled “Exporting the monitoring view”Click the ⋮ menu at the top right of the monitoring list, next to Edit, and choose Excel or PDF to export the current monitoring view for the selected period. The export is a report of what you see, not a template — you cannot fill it in and upload it back. Each row is one client and period, and every monitoring type gets three columns:
| Column | Meaning |
|---|---|
| Agreed | The target you set for that period |
| Completed | What was actually tracked |
| Balance | What remains against the target |
Extra and Total appear twice each — once as a percentage of target and once as hours (h:m) — and a Status column closes the row. Topic and custom field columns carry your own names for them.
Global monitoring vs. client-level monitoring
Section titled “Global monitoring vs. client-level monitoring”- Global monitoring list (main menu → Monitoring): Shows all clients across your company. Use this for company-wide reviews.
- Client-level monitoring tab (client profile → Monitoring tab): Shows only that client’s monitoring history and current status. Use this when working inside a specific client’s profile.
Both views use the same underlying data. Changes in one place are reflected everywhere.
Saving monitoring views
Section titled “Saving monitoring views”Click Save bookmark in the toolbar to save your current filter configuration. Bookmarks restore all filters and the selected period when loaded, making regular monitoring reviews one click away.
Troubleshooting
Section titled “Troubleshooting”Monitoring shows no data for a client
Section titled “Monitoring shows no data for a client”Verify the client has targets configured. If the client is brand new and never had targets, the period will be empty until you enter the first set — after that, future periods inherit the most recent active setup automatically. Open the monitoring editor for that client and add the targets.
Custom field volumes are not appearing in monitoring
Section titled “Custom field volumes are not appearing in monitoring”Go to Settings & Apps > Tasks > Task Fields, find the field, and confirm the Monitoring checkbox is enabled. Only Number-type fields can be used as monitoring targets.
Topic-based monitoring is not tracking time
Section titled “Topic-based monitoring is not tracking time”Go to Settings & Apps > Tasks > Topics, open the topic, and enable the Monitoring checkbox. Without this, the topic does not appear as a monitoring column.
All clients show green even when work clearly exceeds commitments
Section titled “All clients show green even when work clearly exceeds commitments”Check the ± range value on each target. A very high range means the status stays On track even with significant overruns. Reduce the range to tighten the threshold.